Thursday, June 30, 2011

Cherry-Streusel Muffins

 I am a big fan of maraschino cherries and have been since I was young.  I love eating them straight out of the jar. I found this recipe on another blog.  They have some great recipes.  Stop by and check it out. 
These muffins are simply amazing if you have a love of cherries!  They are just as good, and possibly even better, than bakery muffins you get in the store.
This is not a recipe you can easily throw together and bake.  It does take a little preparation time.  For example: cutting the cherries and almonds.  If you plan ahead and purchase sliced almonds that will cut down on the preparation time.  I had whole almonds on hand and chose to use them.

You can speed up the time by using scissors to cut the cherries.  I cut them in fourths.  Once cut, you should then place them on a paper towel to help absorb some of the liquid as mentioned in the blog.

Cherry-Streusel Muffins
Makes 12 muffins
Topping
2 tablespoons packed brown sugar
2 tablespoons all-purpose flour
2 tablespoons finely chopped sliced almonds
¼ teaspoon ground cinnamon
2 tablespoons firm butter
Muffins
1 jar (10oz) maraschino cherries, drained ¼ cup juice reserved
1 ⅓ cup all-purpose flour
⅔ cup granulated sugar
1 ½ teaspoons baking powder
½ teaspoon salt
⅓ cup vegetable oil
1 teaspoon almond extract
½ teaspoon vanilla
2 eggs
3 tablespoons sliced almonds
Heat oven to 400° F. Line 12 muffin cups with paper baking cups. 
  
In medium bowl, mix all topping ingredients, cut in the butter, using pastry blender, or two knives until crumbly. Add almonds, set aside.

Chop cherries; set aside on paper towel. (scissors work well.)
 In large bowl mix 1 ⅓ cups flour, the granulated sugar, baking powder, and salt. 
In small bowl, beat oil, reserved cherry juice, almond and vanilla extracts and eggs with a fork until blended. 

Stir the liquids into the flour mixture just until flour is moistened. 
Fold in cherries and almonds. Divide evenly among muffin cups. Sprinkle each with about 1 tablespoon of topping.


Bake 19 to 23 minutes or until toothpick inserted in center comes out clean. Immediately remove from pan to wire rack. Serve warm or cold.


Wednesday, June 29, 2011

Patches

     
I feel I have been doing a lot of mending clothes lately.  Mostly my husband’s jeans.  I realized today why I have rarely had to do any mending before now.  Over the past several years my husband has worn a uniform.  With frequent changes in uniform designs, and having to wear a specific design for different locations, he was always getting new work clothes.

Area to be patched.


Now that my husband is no longer wearing a uniform and is back to wearing jeans and t-shirts to work, I find myself venturing into patching his clothes to extend their life.  My husband used to wear his jeans until the holes became too large to wear any longer.  We usually discarded them at this point.  This didn’t happen very often, because his jeans were seldom worn.

I started mending my husband’s jeans a couple years ago, but it was only when a small hole would start to appear next to a pocket.  At first he told me I didn’t need to bother, then after time I think he realized it extended the life another three to six months.  Now when he gets a hole, or rip, he is asking for them to be mended.  It seems I am mending his jeans every couple weeks lately.  At first I was able to do the work by hand while watching television at night.  Now that the areas are getting larger, I have had to start using patches.

Cut the patch large enough to cover the area.
It has been several years since I have ironed, or sewn on a patch.  Most of the patches I have worked with in the past were iron on, and used mainly for decorative purposes, not out of necessity. 
Round the corners when cutting.

Follow the directions that come with the iron on patches.  Be sure to choose the color that goes best with your fabric.

Ironing the patch

You want to make sure the patch is adhered well. 

After ironing.


Mending something to extend the life of the garment  is something my grandmothers did quite often.  When I was younger I used to think it was out of frugality, but as I got older I realized it was because they still saw something good in the item.  It wasn’t at the end of it’s life yet.
Sewing the patch on with a zig zag stitch for added durability and staying power.


I can remember my brother taking his jeans to Grandma B to have her patch them for him.  She was very good at sewing and mending.  My grandfather’s older coveralls always had patches where she had mended them.  Grandma became the go to for mending jeans for the entire family.  She was also the one who sparked my love of sewing.

Having an open arm machine works best for these types of projects.
While in 9th grade everyone had to take sewing for a semester.  One project we made was a shirt.  I can remember my grandmother helping me and showing me how I needed to do it.  The project had to be completed in class, but I can remember us making another one at her house so she could show me how and help me with the project.  I can remember wearing that shirt proudly.
Completed project.
 
Over the years my grandmother helped me with several  sewing projects.  She could make slip covers for cushions that were amazing.  The first camper I had she made me slip covers for the seats that fit perfectly!  Some of the projects I completed even amazed her.  After she got breast cancer she didn’t have the energy she used to and could no longer do the things she enjoyed.

On one of their visits to my house my Grandfather came in carrying her favorite sewing machine.  She was going to “let me use it“.  Grandpa handed it to me and winked, I don’t think she will be needing this back.  My grandma just grinned.

Still today that memory brings tears to my eyes.  I am very thankful for her inspiration over the years and still miss her each and every day.  Having her sewing machine to use makes my projects more special to me.

Tuesday, June 28, 2011

Making Your Own Laundry Powder

I first wrote about Making Your Own Cleaning Products quite awhile ago.

Since then, I have made my own laundry soap.  I made it in liquid form and didn't particularly care for it.  I like to see suds in the washing machine.  I know, it's ingrained in our brains. Seeing something suds means it's cleaning.  After all, remember the scrubbing bubbles commercial?  "We work hard so you don't have to".

It took me awhile to get over that issue when using the homemade laundry soap.  The recipe I used made a 5 gallon bucket full.  You had to boil the grated soap with water on the stove, mix it in a bucket with the other ingredients and add water to fill the bucket.  The bucket took up quite a bit of space sitting near the washing machine, and after time I stopped using it.  I think there is still a couple inches in it.  I will eventually get it used up.

Here is what I didn't like about it:
There were NO suds
You had to add a bluing agent to white clothes, or over time they became dingy.
It didn't do well on heavily soiled items, even when pre-treated.

Yes, making your own laundry soap is less expensive and better for the environment. However, I had a friend tell me she didn't purchase the more expensive soaps in the first place and felt she really didn't save any money when you consider the time in making it.  The homemade version can be used on less soiled items if you can get over the fact it does not suds.  This would be great for front load washing machines. It is also less fragrant.  I used Ivory soap, so the only smell was that of the Ivory soap.  You can always add essential oils such as lavender, lemon, grapefruit, peppermint, and so on.  The choices are endless for creating your own fragrance.  I often add eucalyptus to the rinse cycle.

I am a big fan of Tide.  I always have been.  Over the past several months I still used Tide for heavier soiled items and used the homemade when I felt I could.  Because of the increase in cost, and decrease in size of brand name detergents, I opted to try the powder form versus the liquid I had always purchased.  I found the powdered Tide did better at getting out the grease, grass, and mud stains than it's liquid counter part.  I will no longer be purchasing the liquid form for that reason.

Today I decided to give making homemade soap another try. I opted for a powdered version which is a little different ratio from the liquid I previously made.

The recipe called for 2 cups of grated soap.  Castile, fels-naptha, or your choice of bar soap.  I used
fels- naptha.  Grating the bar measured 2 1/2 cups.


 I added 1- 1/2 cups each baking soda, borax, and washing soda.  All of these items can generally be found at your local grocery store.
Mix the dry ingredients together with the grated soap.
Shake to mix before each use.
Use 1/8 cup per load. 


I currently have heavily soiled jeans soaking in the homemade version and to give it a fair try, will continue to soak the same amount of time I do with powdered Tide.  I have already noticed the water is very blue.  This means the homemade soap is taking the dye out of the clothing.  Something soaking in Tide does not do.  I will keep you updated on how well it does.

Monday, June 27, 2011

Journey To A More Simple and Greener Lifestyle In Your IN BOX

If you are a frequent reader please be sure to click the follow button off to the right.  I love seeing new faces and often find new inspirational blogs from many of you followers.
 
If you would like to have updates e-mailed to you be sure to enter your e-mail address where you see this box: Follow by Email
 
 I look forward to sharing more of our journey and reading the inspirations of many others!
 

Boiling Eggs

I have learned that the eggs you purchase in the store are often in storage before being sent to the stores or restaurants for our consumption.   There is no telling how long they may sit in a store warehouse or on the shelf before they make it to your table. Although the USDA has requirements, how closely are they actually followed?

I found this information on BackYardChickens Forum:
"Egg cartons are stamped with the day they are packed, and a Sell By date.  The day packed is typically a julian date, 045 would be the 45th day of the year.  The Sell By date is typically 30 days from that and is in month-day format, e.g., FEB 16.  The cartons are stamped with a plant code, P-0155 or WI-005 would be examples, P codes are USDA inspected plants, two letter codes are state inspected plants.  If they are processed in a state inspected plant, they typically stay in that state.  Most plants are USDA inspected though.  How old they are before they are packed varies and there is no way to tell.  If they are bought and sold between companies they are stored on bulk pallets and would be processed at the receiving end to be placed in the buying companies own packaging, although the USDA recommends that happen within five days."

For years I didn't care for eggs. I didn't care for the taste to them and they always seemed a little like rubber to me. I can remember enjoying hard boiled eggs my grandma used to make.  I have memories of sitting in her wooden high chair eating warm hard boiled eggs covered in butter.  I didn't put it together until recently that the eggs she always fixed were fresh.  She always had chickens when we were younger, and until getting my own, could not understand her love of chickens.  I do now!

I have always boiled eggs the same way. I learned how to boil eggs while taking home economics in high school. Do they still teach home economics?  I always used store bought eggs for cooking and boiling.  As I mentioned, I didn't care for them, so to me eggs were basically for cooking.  If boiled, they always peeled without problems.

Since having fresh eggs, peeling hard boiled eggs has become tedious.  The shell does not come off well, and especially the eggs from "Red".  Her eggs would not peel without taking a layer or two of the egg off with it. After doing some research I found that as eggs age, a gas is produced that allows the egg to actually separate from the shell.  There becomes a space.  This is why store bought eggs always peeled so well for me.  They were old enough to allow for a gas to produce space.


I read on a blog last week (if I could find the link I would post it) a fool proof method for boiling even the freshest eggs.  Many people have their own methods that are similar I'm sure.  I tried this method to make some deviled eggs.  It was amazing.  The eggs peeled so easy, I couldn't believe it.


  Directions for easy to peel boiled eggs.

Bring a pan of water to a rolling boil.  Lower the eggs into the boiling water.  I used a spaghetti stirrer.  
Boil for 14 minutes. 

Rolling Boil
Place eggs into an ice water bath until cold. 

I repeated this step twice.  Once the ice was melted from the first bath I drained the water and added more ice and water.
Ice Water Bath
Once the eggs were really cold I peeled them. 


Peeled Eggs

Sunday, June 26, 2011

Raised Garden Bed with Trellis


If you want to start a square foot garden, but aren't handy at construction, I found this on the Lowe's web site:

It comes complete with a trellis and doesn't look like too bad of a price considering the price of lumber these days!

Planning your Garden Beds~This is a Wonderful Tool!

Gardener's Supply Company has a wonderful web site that allows you to plan your garden beds.  It's a wonderful companion to the Square Foot Gardening Method.  It allows you to plan and print your bed.  You can change the size of the bed to accommodate the area you will be planting.  You don't have to use the square foot method to use the site.  It also works well for flower beds!

Follow this link to get started planning your beds!

Saturday, June 25, 2011

Getting Creative with Expanding My Vegetable Garden

  
I have been gardening with the Square Foot Garden Method for four years now.  The first year I was able to plant more of a variety of vegetables because my strawberries and mint had not spread to the extent they are now.

Now in the fourth year, the strawberries and mint each utilize a box of their own.  This means I have had to become more creative at finding places to plant.  We have such a population of rabbits that my creativity has to include that obstacle.  I have to enclose each bed with fencing as well as cover the top of it.  If I don’t cover the top, they jump the three foot fences.  Crazy little critters, anyway.


Last year while my husband was away I purchased some round raised bed kits.  I only needed one at the time, so the others got placed in storage.  My mistake.  I should have had them in place, before he got home, because now he won’t let me add anymore.  He hates mowing around my beds.  I think he does a wonderful job, however, he mumbles it takes him too long to trim and mow around them.


When I nicely begged to have more beds added to expand my gardening this year, I was met with disapproval.  With the economy the way it is, I felt a huge push to expand our garden.  Wanting to plant as much as I could, to lessen our grocery bill, not to mention have fresh vegetables, I had to get creative.   He joking said, “tear up the flower bed out front and use it.”  I didn’t tell him, but I had already considered that option.  I just didn’t really want to remove all of the marigolds I had planted there several years ago.

Each year I would save the seeds from the marigolds and spread them in the bed so they would return the following year.  They would bloom until frost and I didn’t have to do anything but remove the dead flowers.  I would also leave the plants in the bed throughout the winter for the rabbits to eat.  They in turn, helped to fertilize the bed each year.  They also attracted bees to our yard which was also beneficial for pollinating my garden.

The marigolds would also pop up in various places throughout the yard which was an added benefit in detracting pests.  If they pop up in a garden bed, I often leave a plant or two to help keep the bugs away from the vegetables. 


Marigolds popping up with other flowers.
Marigold trying to grow among the lettuce and radishes

Having begged for more space, and not getting any lenience, I had no other option but to rip out the flowers and get busy.  I added some peat moss, vermiculite, and compost to the bed to enrich the soil and started planting.

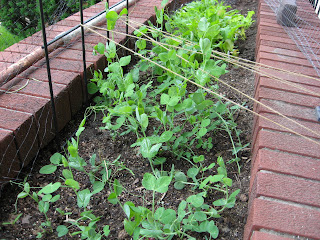
My newest vegetable garden

Onions, Kale, Brussel sprouts, and Cabbage


I crammed as many vegetables and herbs into the area as I could.  

Peas being trained to grow up the trellis

 
Marigold among the mesclun

Leeks

Peas
  
Basil and Zucchini

Parsley


Until last week I was able to lay plastic garden fencing over the top to keep the rabbits out.  As the plants grew in size, they started to poke through the holes.  Unable to maneuver the heavy gauge wire fencing I have around the other beds by myself, I had to opt for the plastic fencing and bird netting.  It’s not the prettiest, but I have vegetables!  When I was done my husband had to comment how tacky it looked.  I said I was doing the best with what I had to work with.

Ironically, later in the evening my husband also made a comment to me that I didn’t really have enough garden beds to harvest enough to do much with.  Really?  Did he not hear me saying this while begging for more space?  He then commented, he didn’t think our yard was large enough for an adequate garden.  He really should read some of the books we have in our library some day.  I have several books on gardening in small spaces, edible landscapes, and backyard homesteading on as little as a quarter acre.  My dream some day would be to do away with most of the yard, and focus on an edible landscape.  I would also like to move to a place where I can expand my gardening to include fruit and nut trees, and of course have a goat(s) again.  I miss having a goat as a  pet.  My crazy love of goats is, however, for another post.