It's raining today. It has been over a month since we have received any considerable amount of rain. Unfortunately, it's a little too late for my garden. I am hoping to get another cutting on my rhubarb and the rain should make that possible. It will also help yard. We have had to resort to watering our yard, so we didn't loose it completely. The yard had become dry and very brittle. You could hear it crunch when you walked on it. The normal paths taken to water the beds, and take care of the chickens were starting to become more dirt than grass at this point. The rain is a nice and slow steady shower. Just the right amount to allow the water to soak into the ground at a good pace.
I have been a busy beaver lately. I am starting to feel as if I am nesting, and I know that's not possible! Maybe it's gearing up for winter. Friday our family went to a cattle sale. I had went to the sale barn as a child with my grandfather and have fond memories of those times. Crazy me, I made a comment to my husband that I thought that was something we should do with our son. He happened to have the day off and there was a sale going on. Just my luck.
We got up early and headed to the sale, which was a 45 minute drive away. The aroma when we arrived smelled just like my grandparent's place. It brought back a lot of memories. Needles to say, my son wasn't as impressed. We watched as they auctioned off all ages of cattle as well as breeds. We were able to get an idea how much beef was selling for if we ever get an acreage and decide to raise a few for meat.
It was a little disheartening to watch a mother cow and calf sell together, only to have the calf brought back in to sell on its own. The poor thing wanted its mother and was freaking out because they had taken her away. A little while later a newly born calf was brought in by itself. I kept nudging my husband to bid on it. He told me to stop or they are going to think we are serious. I told him I was serious, which he knew. He asked where I was going to put a calf. I am sure I could come up with somewhere..... We didn't get it, despite my desire to take it home.
I went to a tag sale with some friends on Saturday. Nicole had found so many neat things at a recent one to outfit her new house, she convinced me to go with her. This was out of the ordinary for me. It was merely a glorified garage sale. You show up early and wait in line to get a shopping number. This meant getting up early. Something else I don't care to do. My husband and son went with me. I had looked through the pictures online and saw a pressure canner as well as a White sewing machine I was interested in. I enlarged the picture of the pressure canner and thought I could see a $2_. I was hoping it was marked $20. If so that was a good deal. New pressure canners sell for around $200. We arrived before Nicole and I waited in line to get my number. I was 7. After we got our number we then had to wait until 8:00 to be allowed in.
During our 45 minute wait Nicole dared me to go ask where the things I was wanting were in the house. She said one of the guys running the sale wouldn't tell you. I took this as a challenge. I went up to one of the other guys and asked about the pressure canner and things went forward from there. The people outside not only told me where the things I was interested in were, such as the basement, they told me exactly how to get to the basement stairs from the front entrance, and where I needed to go once I got down the bottom of the stairs. From then on, I was on a mission. If you have ever went shopping with me, you have found I generally have in mind what I am looking for, and once I find it, I'm done.
At 8:00 we lined up and were let into the house in order of our numbers. Nicole was let in a few people behind me and had other things she was looking at. I quickly passed the older gals and headed straight for the basement. I may have even been the first one down there. My son went with me to carry anything that needed carrying. The canner.... We found it, it was marked $20. I opened the lid as my son held it to make sure it was as nice looking inside as it was on the outside, and off to the sewing machine we headed. I found it, ripped the bottom half of the tag off of it and headed upstairs to find Nicole. I was done, except for a small pyrex dish I spotted while walking through the kitchen. It was $3. Now to settle up, and have my husband pack up the sewing machine. It was actually for my mom. It came with a neat sewing table as well all for $65. I will have to post pics of both the canner and sewing machine when I can get them taken. All in all it was a good day for bargains!
Tuesday, August 30, 2011
Tuesday, August 23, 2011
Getting Organized
For some people organizing can be overwhelming. Being an Aquarius, organizing is one of my traits. I love to organize things. Following through to keep them organized is another issue. One of the issues for most of us is we don't know what to do with all of our stuff, or how to get it organized to be used more efficiently. It can be expensive to purchase shelving, containers, or cabinets to help one get organized, so where do we begin?
Start small. If you start with a small area instead of an entire room or house it is easier. Start with gathering like things. Maybe you start out simple by placing all of your items for your morning coffee in a small basket in the same cupboard or even on your counter.
If you are like me, cupboards are sparse, and so is counter space. My son found some nice coffee mugs on clearance at Kohls awhile ago. I loved the color, but where was I going to put them? I didn't have the space in my cupboards for them. Instead of tying to find a place in the cupboards, I bought some inexpensive cup hooks and had them hung. Now they add color to my kitchen. We placed them in an out of the way place just high enough my coffee pot can sit under them.

I don't have enough drawer space to accommodate utensils, so I use a crock. My mom gave this to me several years ago for this purpose. I have placed it on top of my refrigerator in the past, but that wasn't very convenient. Instead it now sits on my counter next to the stove. Not only is it decorative, it's functional.

These milk bottles were my grandmothers and I have had them for many years. I'm sure they are worth something, and have thought about selling them, but can't seem to part with them. I have displayed them in various places around my house, shoved them into cupboards, and now they have a new use of holding my dish brushes.

I purchased several containers like these over the years and use them all over my house. It is easy to place a label on them and change it when I find a new use for the basket.

These containers can easily be washed, while baskets cannot. I use these baskets in my freezer to separate like items and keep things from falling out. Check out these images for pics of freezer organization.
These baskets stand up to the extreme cold and won't crack when used in the freezer. I have purchased them at both Walmart and the Dollar Store.
I use these for many things:
-Nesting boxes for my chickens
-Organizing my gardening seeds
-Canned foods
-Sewing projects
-Canning jars
-In cupboards to hold small containers or lids
-Hold magazines
They make a deeper version which we use to hold car washing supplies and cleaners.

I also have several baskets around my house. Some of my baskets are Longaberger Baskets, that I purchased many years ago. These pictured are not. They just look close enough that people have asked if they are.

I found these basket about 10 years ago at Walmart for very little money. I bought several of them in various sized and used them to hold items on my bakers rack. At the time I lived in a very small apartment and had even less cupboard space. The baskets held my dish towels, dishrags, and so many other things.
Although baskets are very pretty, and I love how they look, they tend to collect dust just like anything else. I also sewed the basket garters and liners to spruce them up.
If it's books, or knick knacks you want to organize, you can purchase inexpensive shelving units that will do the trick. You can also have shelves placed into closets for added storage for very little expense. As a carpenter, my father was doing this many years before it became popular. He was always ahead of his time. He placed drawers in kitchen cabinets for pots and pans. He would place shelves in the corners of our closets to hold my purses, shoes, boxes, games, just about anything you want to place out of the way. When ever I move to a new place, I have him rearrange my closet so that I have two hanging rods and a shelf above them for shoes. This gives us more hanging space for clothes and we don't have to pack them away each season. He also added this opening for me to get to storage above our stairs which was virtually inaccessible. I have yet to finish the doors.

I had more books than I had space for. I didn't want to purchase an expensive book shelf at the time, but really need to find something to house our ever expanding collection of books. I had a space at the top of my stairs that was empty or a catch all for things that needed to be put away. At one time a small desk was there, laundry hampers and as I said, junk. I would have loved to have placed a corner curio cabinet there, or a custom made book case, but this house has always been temporary, so spending money on something we probably weren't going to get to enjoy wasn't in the cards. I was getting really frustrated with our piles of books and after finding a book shelf for my son's room to spruce it up, decided to get one for the area as well.

This book shelf was $15 at Walmart. I didn't care that it won't last as a good quality one would and we can even leave it if we move. For the price it helped me get a little more organized as well as find a use for the empty area.

The black shelving unit my son chose when we redecorated his room is much classier looking if you are into black.

These wire shelving units are great. This happens to be one in my son's room.
We have several of these around the house. I have two in an L shape in our store room holding tubs of Christmas decorations, Halloween items, fabric, electronics, office supplies, wrapping paper, etc. You can adjust the shelves to the height you want. Some of them even have casters and wheels so you can easily move them. They can usually be found at Sam's club and at times Aldi's has them as a special purchase. I have several of them in various places in my basement holding my stock pile of canned goods, laundry soap, dry goods in tupperware such as flour, sugar, rice, beans, pasta, and so much more!

A few years ago I wanted something to house our ever expanding collection of movies. You could say we collect movies versus paying for cable. We watch from our collection often. I found this cabinet for a little over $100 and thought the pie safe theme would go nicely with my dining room. It's made of oak, which is my choice of wood. I love oak furniture and when purchasing a piece that will last a long time, it is always oak.

Look at the amount of movies this piece houses! And it is all out of site, not to mention in a closed cabinet not collecting dust.

I like to purchase functional furniture pieces. This piece houses our CD collection.
Keep in mind these are things I have accumulated over the years. I didn't go out and buy everything at once to help with organization. Again, start small. Decide what is bothering the most and start there. Making things more simple and saving you time is always "a good thing". Maybe you want to start in your bathroom. I used to have a hamper for each family member in our bedrooms. That meant I never really knew how much laundry I had to do until I took it to the basement and started sorting it. This took more time and energy. Something I usually have very little of. By placing the hampers into the bathroom and designating each one for specif clothing it has saved me a lot of time.

These are actually inexpensive trash cans. One if for light colored clothing and the other for dark. I know when the hamper is full there are enough clothes to do a load of laundry.

The same goes for my towels. I used to use a normal laundry basket until I found these at Walmart. I only wish they would have been available in white. These work great for towels since they are usually wet. The holes allow for ventilation. I have two of these. One is marked for those towels I can use bleach on and the other for colored towels. Again, once the basket is full, I know there is enough to make a full load of laundry.
Shoe boxes are another great idea to help get your bathroom organized. I use shoe boxes in my bathroom closet to house first aid items, deoderants, soaps, lotions, and basically anything that will fit into them. It helps keep similar items together and from rolling or falling out of the cabinets. I also use shoe boxes in our craft cabinet.

Magazine holders are great for organzing paper too! I have these turned on their side and use them to hold construction paper, folders, printing paper, as well as card stock paper for making cards.


This cart hold my stamping items. These were purchased at Staples when they were on sale a couple years ago. The cart has wheels so I can move it to another room when we want to use the items. I actually have two of these carts. One was damaged in shipping so it was free. The other cart used to hold my coupon items, but now has knitting in it.
Finding a use for items you may already have around the house not only saves you money, it is recycling at its best. It puts an item to use in another area of your home.

This changing table is a good example. It was given to me years ago. It has been in our storage room since we moved here 8 years ago being used as a shelf. Finally getting rid of some of the things it was holding made we get creative with another way to use it. I could sell it, but then I would most likely have to buy another shelf to take its place. Instead, I decided to set up a sewing area in my bedroom.
This area behind our bedroom door is always out of site, and has been the dumping ground for two filing cabinets, clothes that no longer fit, and about anything else we wanted out of site. A couple weeks ago I got a bug to move the filing cabinets into the store room and switch them out with the changing table to hold my sewing things.
I moved my machines up to my bedroom and made more room in my dining room which will be great! I can now sew in my bedroom and not have to worry about moving from room to room to accomplish a project. Once I get it all organized it will be in one place. The oak towel rack sitting next to the changing table will be hung on the wall to hold material I have ironed. It will help to keep it from wrinkling while working on the project. I have a holder for my ironing board and iron I am wanting to find a place for as well. It's a work in progress.

My rack for holding tread sits on the back of the table perfectly.
Since this is a work in progress, and I am in the mood I had better get back at it. I hope this has given you a few ideas to get started organizing and I'm sure I will have more for you in the future.
In the meantime here are a few web sites and blogs that may help to inspire you:
The Container Store web site has many ideas for getting organized.
http://www.bohofarmandhome.com/
http://homesteadrevival.blogspot.com/search/label/Organizing%20Life
http://browse.realsimple.com/home-organizing/organizing/index.html
http://creativeorganizing.typepad.com/
http://www.hgtv.com/organizing-and-storage/package/index.html
Friday, August 19, 2011
Frugal Friday~Making Your "Bisquick" Baking Mix
I can't tell you how long it has been since I have purchased "Bisquick" (baking mix). We used to use bisquick for a lot of things. Pancakes, biscuits, and my husband's favorite...pizza crust. He likes the taste of bisquick as a pizza crust. The rest of us, not so much.
After reading about making your own, I started to do what I always do, research. I was skeptical at first, but found a recipe an Allrecipes.com that looked simple enough to try. If you use the tools on the site you can change the recipe according to the servings you would like to make. You can either make enough to use immediately or make extra for later use.
I have used this recipe several time to make drop style biscuits and can't tell the difference between prepackaged mixes. I have also made "Red Lobster" style biscuits by adding grated cheddar cheese and garlic to the mix. This recipe is less expensive than purchasing prepackaged mixes and won't get old. You can make a fresh batch each time you need baking mix!
This recipe is for 12 servings. I always use the calculator and make it for 6. I usually have enough for two batches of biscuits for our family of 4.
Ingredients
- 9 cups all-purpose flour
- 1/4 cup baking powder
- 1 tablespoon salt
- 2 cups shortening
Directions
- In a large bowl, combine the dry ingredients. Cut in shortening until the mixture resembles coarse crumbs. Store in an airtight container in a cool dry place or in the freezer for up to 8 months.
Here is the recipe for 6 servings.
Ingredients
- 4-1/2 cups all-purpose flour
- 2 tablespoons baking powder
- 1-1/2 teaspoons salt
- 1 cup shortening
Directions
In a large bowl, combine the dry ingredients. Cut in shortening until the mixture resembles coarse crumbs. Store in an airtight container in a cool dry place or in the freezer for up to 8 months
Wednesday, August 17, 2011
Making Salsa~ The easy way!

I was given a bunch of tomatoes from friends ( around 18 pounds) and wanted to find a way to use them. Another friend suggested salsa. I didn't have peppers or onions from my garden and the thought of buying them to make salsa seemed a little expensive. She said no, you don't need anything but tomatoes. You just buy a packet that has everything else in it. When she started saying Mrs... I knew exactly what she was talking about. Mrs. Wages makes a variety of mixes to make pickles, spaghetti sauce, ketchup and so much more. I have used the packets for pickles before as did my grandmother. I really liked them, so why not try the salsa mix? She suggested I get the hot, but I chose to try the medium. Good choice. Even the medium is spicy for me.
My salsa ended up costing me nothing, other than time and energy to make it. The tomatoes were free and when I went to purchase the packets they were on sale for $2 each. After I was already on my way to the parking lot, I noticed they rang up at $2.39. I went back inside to get the money back that I was overcharged and she handed me over $7 back. She said it rang up incorrect, so it's free. Score! I didn't intend on receiving it for free, I just wanted the overcharged amount back. But FREE is good too! Makes me feel like buying more packets to make even more! Each packet will make 5 pints.
 Follow the directions on the packet. You need to place the tomatoes in boiling water and then a cold water bath to remove the skins. Core them and cut into chunks. The directions said to cut into large chunks, however, we prefer smaller pieces of tomato in our salsa.
Once you have them all cut up you add vinegar along with the packet mix. I had enough to make three batches.

Bring to boil, reduce heat and simmer 10 minutes.
Fill your jars and place in a hot water bath for 40 minutes.

Remove and let cool.


Saturday, August 13, 2011
A New Fruit Bowl

Pears were on sale for .99 a pound last week so I decided to buy a bunch hoping to dehydrate some of them. I left the pears sitting in the bag from the store for a couple days because I didn't have anything large enough to put all of them in and not have them sitting on top of each other. At least I didn't think I did.

While in the dining room looking at my new pitcher and bowl sitting there on the table, it came to me. Why not use the bowl, as a big fruit bowl? It works great! Not only does it hold all of the fruit, it looks good sitting there too! I am finding new places for a lot of things around my house lately. It's as if you have gotten something new, without spending any money. Coming up with ideas and finding another use or place to display things is recycling in action! Here are some other neat idea for repurposing items.
Friday, August 12, 2011
Frugal Friday~Making Your Own Croutons
I used to make my own croutons, but that was around 20 many years ago. It was simple enough to do, so why did I stop? I suppose I got lazy. It was easy to buy a bag of croutons and not even think about what went into them or how much they cost. Croutons weren't just for salads. They became something to munch on when we wanted something crunchy to eat.
I haven't bought croutons for over a year. Part of the fact is that I now how braces and crunchy things aren't as easy to eat. Let alone pain free at times. Lately, I have been catching myself yearning for croutons when shopping for groceries. I take a look at the price, along with the selection, and pass them by. I am not a big fan of garlic. I don't like to taste my food for two days later. I like it, but in moderation. Many of the croutons you buy contain more garlic flavor than I like. Hence the journey to make my own.
I was inspired by a friend, Maria's, blog postings on "Things I May Never Buy Again" and another in Part 2. I have been wanting to make some croutons since reading her posts a few weeks ago. Lotion as well, but that is for another day. I had an extra loaf of bread we were neglecting so I decided to start the venture.
I searched for a recipe and the first site that popped up was How to make croutons from left over bread. Even though my bread wasn't "left over" I was ready to give it a try. I laid the pieces of bread out on my dehydrator tray to dry out for a few hours. The bread was really moist and wasn't going to cut easy. After a few attempts with a knife I noticed the site mentioned using scissors to cut the bread. What a great idea! It worked great.
After cutting the bread I started making my concoction. This recipe, or simple directions was just what I was looking for. I hate following directions. Just ask my husband. Any time I can throw in ingredients and come up with something edible is great by me!


I haven't bought croutons for over a year. Part of the fact is that I now how braces and crunchy things aren't as easy to eat. Let alone pain free at times. Lately, I have been catching myself yearning for croutons when shopping for groceries. I take a look at the price, along with the selection, and pass them by. I am not a big fan of garlic. I don't like to taste my food for two days later. I like it, but in moderation. Many of the croutons you buy contain more garlic flavor than I like. Hence the journey to make my own.
I was inspired by a friend, Maria's, blog postings on "Things I May Never Buy Again" and another in Part 2. I have been wanting to make some croutons since reading her posts a few weeks ago. Lotion as well, but that is for another day. I had an extra loaf of bread we were neglecting so I decided to start the venture.
I searched for a recipe and the first site that popped up was How to make croutons from left over bread. Even though my bread wasn't "left over" I was ready to give it a try. I laid the pieces of bread out on my dehydrator tray to dry out for a few hours. The bread was really moist and wasn't going to cut easy. After a few attempts with a knife I noticed the site mentioned using scissors to cut the bread. What a great idea! It worked great.
 |
| Bread Cubes |

I got out my large roasting pan, poured olive oil in the bottom, added garlic powder, onion powder, dried marjoram, paprika and pepper and stirred to mix. I then added the bread cubes and mixed to coat them. I ended up having to drizzle more olive oil over them and added more spices. For added flavor I sprinkled them with fresh grated Romano cheese. Put it in the oven at 350 degrees. I stirred it frequently, and baked them until crisp. I like mine really crunchy, so I baked them a little longer than most would. I will have to make another batch of softer ones for the rest of the family.
 |
| Finished Croutons |

There would have been more in the container, but I couldn't stop eating them. I also decided to make a salad as an excuse to eat more of them!

Thursday, August 11, 2011
Freezing Sweet Corn
Now that it is sweet corn season, I am sure many of you are enjoying fresh sweet corn on the cob. Did you know you can easily freeze it and have that same great taste year round? You don't have to blanch it before hand either. All you need is sweet corn, sugar, salt, and freezer bags or containers.
My family has been using this recipe for a long time. Each summer my grandfather would grow sweet corn, planted with the planter of course. He would plant enough for all of his five children to harvest as well as have some extra for selling. Our favorite was Peaches and Cream variety.
Husk and clean the corn. Place it in ice water to cool. Cut if off of the cob. Be sure to cut off any bad spots beforehand....and worms. If you want to make a smaller batch just cut the recipe down and mix accordingly.
20 cups of sweet corn cut off of the cob
1 scant cup of sugar (less if you don't want it as sweet)
1/4 cup of salt
Mix well. The more you mix it the creamier it will be. Place in freezer containers or freezer bags and place in the freezer. Cook as you would any frozen corn except it is usually not necessary to add water to this recipe while cooking.
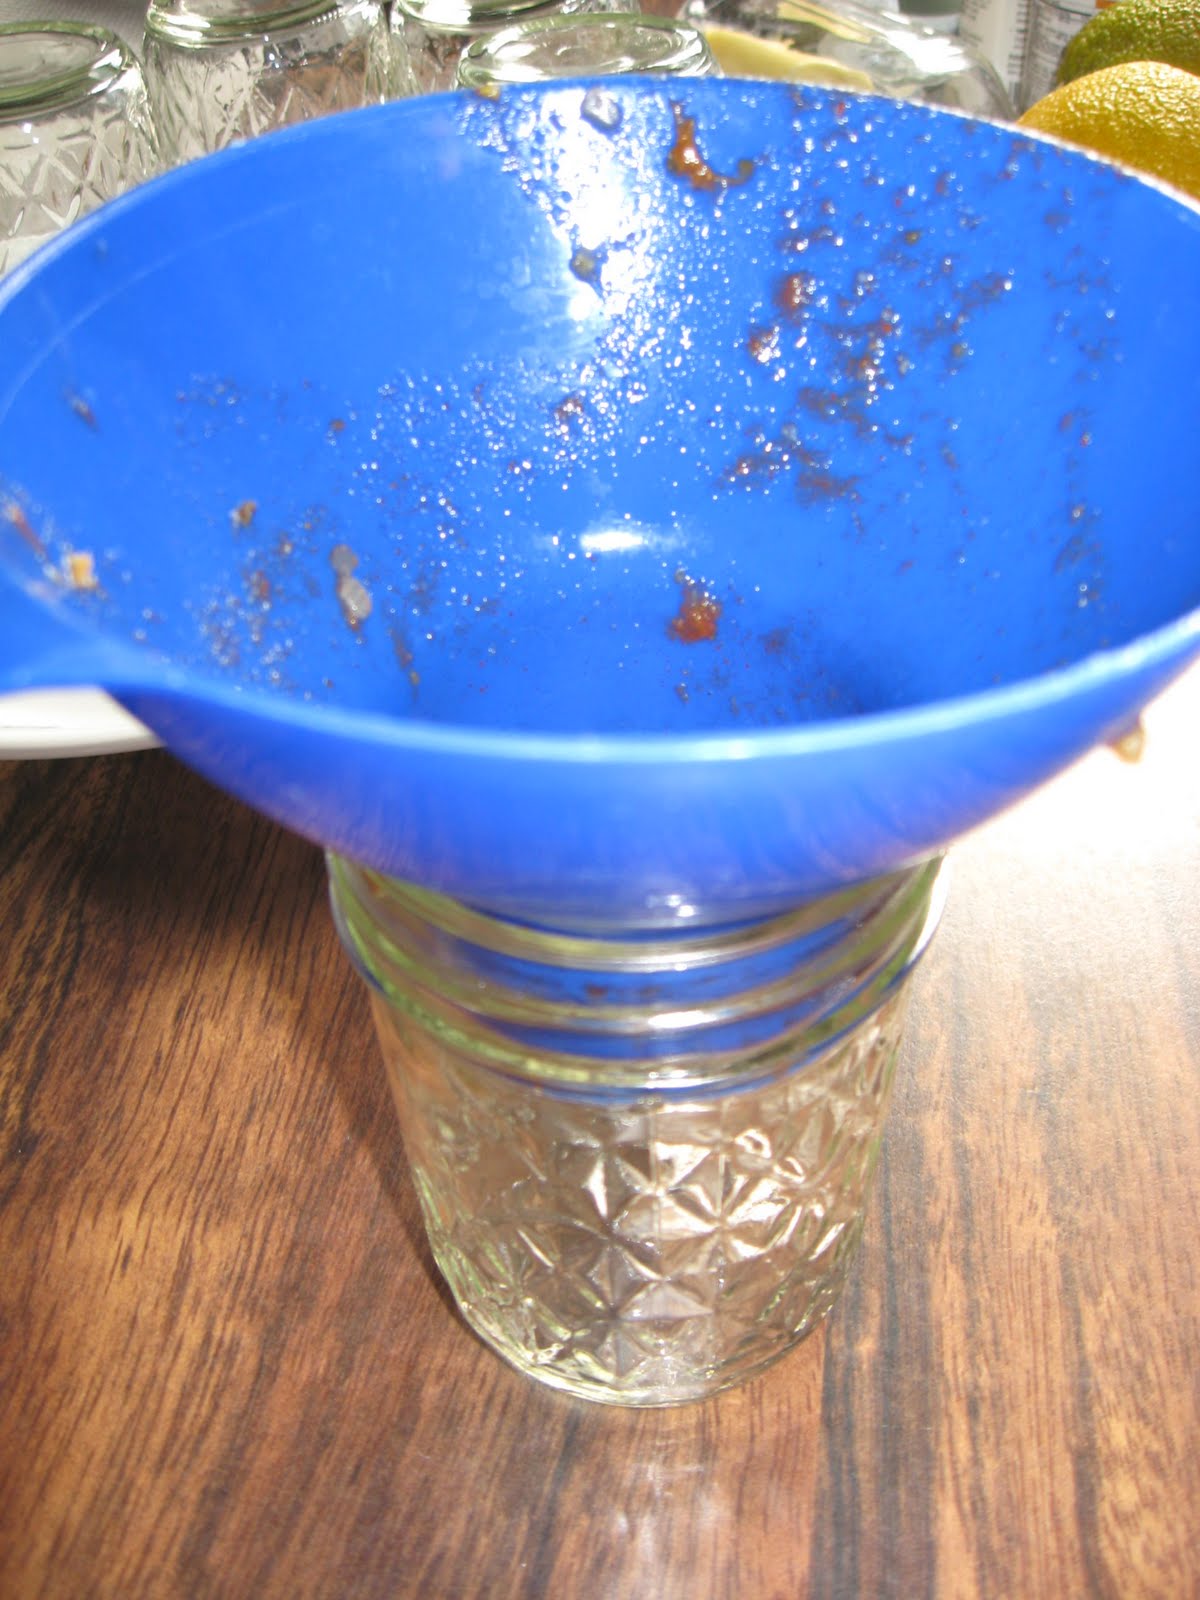
Not Just For Canning


I am sure many of you have one of these funnels sitting around. Maybe you use it once a year when you can fruits or vegetables. I know I used to, until I placed it with my other funnels. I use this funnel almost as much as I do my others. I use it when I am filling a jar with rice or grain to keep it from spilling over the edges. I use it when I measure my home made cleaners. I also use it when I am saving broth and pouring it into a container. It saves messes, and saving me from making a mess to clean up, saves me time!
Wednesday, August 10, 2011
I Believe I Can Fly

We looked outside the other night and what did we find? Little Miss Leghorn was perched on top of the chicken kennel.

She was trying to figure out how to get down. Evidently she didn't think her plan through before she got herself up there. She contemplated her next move for about ten minutes before she jumped down on the outside of the kennel. This meant I had to go outside and put her back in. Crazy bird.
The only thing that comes to mind is Jim Carey doing his rendition of "I Believe I Can Fly" in the movie "Fun With Dick and Jane".
Tuesday, August 9, 2011
Making Your Dollars Stretch
Making your dollars stretch is getting tougher with the economy in the state it is in. Each day seems to be more dismal as we watch the stock markets take yet again another plummet.
Growing up on a farm my parents and grandparents were accustomed to making their money stretch. They didn’t receive a paycheck each week, every two weeks, or even once a month. They received their paycheck once a year, when the crops were harvested. If the weather didn’t cooperate, which was often the case, the income was even less. Once the loan was paid off, which was taken out to plant the crop, repairs made to equipment, and the farm payment made, there was very little left to live on the remainder of the year. We didn’t get clothes because we wanted them. We got them because we needed them. Purchases were based upon a need rather than a want. Something I am sure we all struggle with today.
Many people are used to living paycheck to paycheck. How many of you actually have money saved for a rainy day? With the increase in cost of groceries, gas, health insurance, and pretty much everything else, saving for a rainy day has become a struggle. While the cost of things continues to increase, wages seem to be on the decline. Unemployment figures don’t tell the whole story. The figures fail to include those people who have fallen off of the scale. What about those people who are no longer receiving the unemployment check, but still haven’t found work, or even gave up looking? They are still unemployed.
I know many people have planted gardens this year to help offset the cost of food in the grocery stores. I know I did. That was only one of the reasons, however. I enjoy eating fresh food that, I know is chemical free. And my chickens love it too! I have been very disappointed with my garden this year. We haven’t had enough rain to sustain it, and while I use my rain barrels to water, I often found them empty. I opted to water for about a week and a half using the faucet, but once I received the water bill had to decide if it was worth it to continue watering in this manner. My water bill increased $20 in the short time I watered the garden. And as my parents commented, what did I get for that $20? To continue watering would add additional cost to my water bill and how much would I actually get to harvest for the added expense?
 |
After digging up my potatoes, which was the worst crop I have ever had, I opted to let Mother Nature take its course. I will still continue to water with the rain barrels and hope for rain but can’t see spending additional money on water for very little return. In the meantime I scour the weekly grocery ads and watch for sales. I try to buy items which are on sale and stock up on them until the next sale. Even doing this, our grocery bill has increased immensely. If your spouse ever comments on how much you spend at the grocery store, be sure to take them along with you each time.
My husband couldn’t believe the soaring prices at the grocery store until he experienced it for himself. He was generally deployed, and although I would comment on the increase in price of the cheese we were buying, or how the packages were getting smaller, while still costing the same, seeing it with his own eyes was to say the least an eye opener. The costs of dairy prices are still a shock to us. We are supposed to be in dairy country, but where are the dairy cows now days? We can travel to Wyoming and buy milk for less than we can here. Currently a gallon of milk is $3.59 and a pound of butter $2.48, and that is on sale. If you are lucky you can get butter for $1.99, however, they limit you to one. If you are smart you will make more than one trip through the store to take advantage of the sale price while you can. I will write more about stock piling and buying in bulk to save money in a later post.
For now we strive to make our money stretch as far as we can, just as I am sure many of you are doing. Many people are coming together and sharing ideas with each other, which is great. It’s nice to see how other people are cutting back and making their dollars stretch. I am always open to new ideas and continue to brain storm in ways to make a use for something we already have without spending money on something new.

 |
| How pathetic is this cabbage? |
 |
| My cucumber crop isn't what is normally is. |
 |
| The only tomatoes that are producing well are those which came up on their own. |

Monday, August 8, 2011
Natural Insect Repellent
Prep time: 10 minutes
Yield: 2 Ounces insect repellent
1/4 teaspoon citronella oil
1/4 teaspoon eucalyptus oil
1/8 teaspoon pennyroyal oil
1/8 teaspoon cedar wood oil
1/8 teaspoon geranium oil
2 ounces vodka or rubbing alcohol ( I prefer Everclear for less of an alcohol smell)
Place in spray bottle. Choose one that isn't plastic if possible. Essential oils can break down the plastic of bottles. Apply directly to skin. Reapply as necessary. The scent disappears faster than those repellents which are not natural.
This recipe from the book, Aromatherapy for dummies!
Sunday, August 7, 2011
Natural Peanut Butter Mixer

I love gadgets. Especially when they make my life easier. When I saw this peanut butter mixer on the Frontier Coop web site I couldn't wait to try it. I buy natural peanut butter which tends to separate leaving oil on the top and the peanut mixture on the bottom. If you have ever tried to combine the two you know what a mess it can be. This gadget works wonderfully. No more spilling oil while trying to mix it. The lid fits most natural peanut butter jars.

This can also be used for almond butter and other natural butters as long as the lid the butter comes in is the same size.
Saturday, August 6, 2011
Making Fried Rice for the First Time
My son was begging for fried rice. We were at the grocery store and the thought of buying frozen fried rice didn't sound appealing. I told him, I can make it! He was a little skeptical. I had watched while it was made when I worked at a Chinese Restaurant just out of high school. I thought to myself, how hard can it be? I searched the Internet and came across the recipe below. I cooked the rice just as I had for the broccoli, rice and cheese casserole.
I deviated from the recipe a little. I used 1/4 cup chopped onions which I sauteed in olive oil. I only used about 4-5 baby carrots and I omitted the peas because my son doesn't like them. Instead of soy sauce and sesame oil I used teriyaki sauce, simply because I already had a bottle of it open. It turned out very well. My son was impressed. This is something we will definitely be making again!
Restaurant Style Fried Rice
- 2 cups enriched white rice
- 4 cups water
- 2/3 cup chopped baby carrots
- 1/2 cup frozen green peas
- 2 tablespoons vegetable oil
- 2 eggs
- soy sauce to taste
- sesame oil, to taste (optional)
Directions
- In a saucepan, combine rice and water. Bring to a boil. Reduce heat, cover, and simmer for 20 minutes.
- In a small saucepan, boil carrots in water about 3 to 5 minutes. Drop peas into boiling water, and drain.
- Heat wok over high heat. Pour in oil, then stir in carrots and peas; cook about 30 seconds. Crack in eggs, stirring quickly to scramble eggs with vegetables. Stir in cooked rice. Shake in soy sauce, and toss rice to coat. Drizzle with sesame oil, and toss again.
Friday, August 5, 2011
Look How Big The Babies are Getting!
 |
| Little Leghorn |
 |
| I want to name the black one, Licorice. My son doesn't like that idea. |
 |
| The white rock is still much larger than the others. Could it be a rooster? Oh no... |

 |
| Look at the older girls keeping an eye on the little ones. They are scoping out their competition for our attention. |
Subscribe to:
Posts (Atom)