I introduced the younger chicks to the older ones today. They turn 4 weeks old on Monday and I was ready to have them out of the house. They were starting to try to fly out of the box. It was starting to sound more like they were dive bombing the side of the box.
The introduction didn’t go so well. The older ones were not happy to share their space at all! I ended up “chick sitting” for several hours to make sure they played nice with each other. On girl in particular, (we call her Speckles) was not a happy camper. I had to resort to placing her in “time out”. Each time she was let back out, she would start pestering the younger ones. They weren’t bothering her but for some reason she felt the need to run them down and peck at them relentlessly. Each time she did this, she was again placed in time out.
Speckles was not happy being placed into the coop by herself. She squawked and wined the entire time she was in there. After about 4 times of being placed in time out, she seemed to be a little nicer, but by that time I was tired of chick sitting. I decided to place the smaller ones into the coop and leave the older ones in the outside run by themselves.
After dark I went out to put them all in the coop together. You would think they were going to catch something from each other by the way they were acting. The older ones were all huddled up with their heads in a corner, while the younger ones sat on the other side of the coop. They each would start to freak out if of one of the “others” ventured onto their side. I’m hoping they at least leave each other alone through the night until they can be let back out in the morning.
I’m going to share a recipe I got from a friend, Nicole. These cookies are not only good, they are healthy for you. The best part is they are made with a food dehydrator! You can make these in the summer when you don’t want to heat up your house because it’s too already warm. When I initially started to make these my son’s response was “I’m not going to eat that”. As I was mixing the ingredients, the aroma started to entice him. I gave him a spoon full of the “batter” and had him try it. He immediately asked how soon until they are ready. I said one hour. The smell that fills your house while these are dehydrating is amazing. As soon as they were complete he tested them and gave them his approval.
The recipe consists of ingredients you most likely have on hand. If not, they are simple to obtain. I love the fact I can use my food dehydrator to make them. It’s another reason for me to put my dehydrator to use. If you don’t have a food dehydrator you could use your oven. Just turn it to warm for a few minutes and then shut it off. Having a thermometer inside your oven would be helpful.
The recipe doesn’t make a large batch of cookies, so if you want to try a test batch the recipe as listed is great.
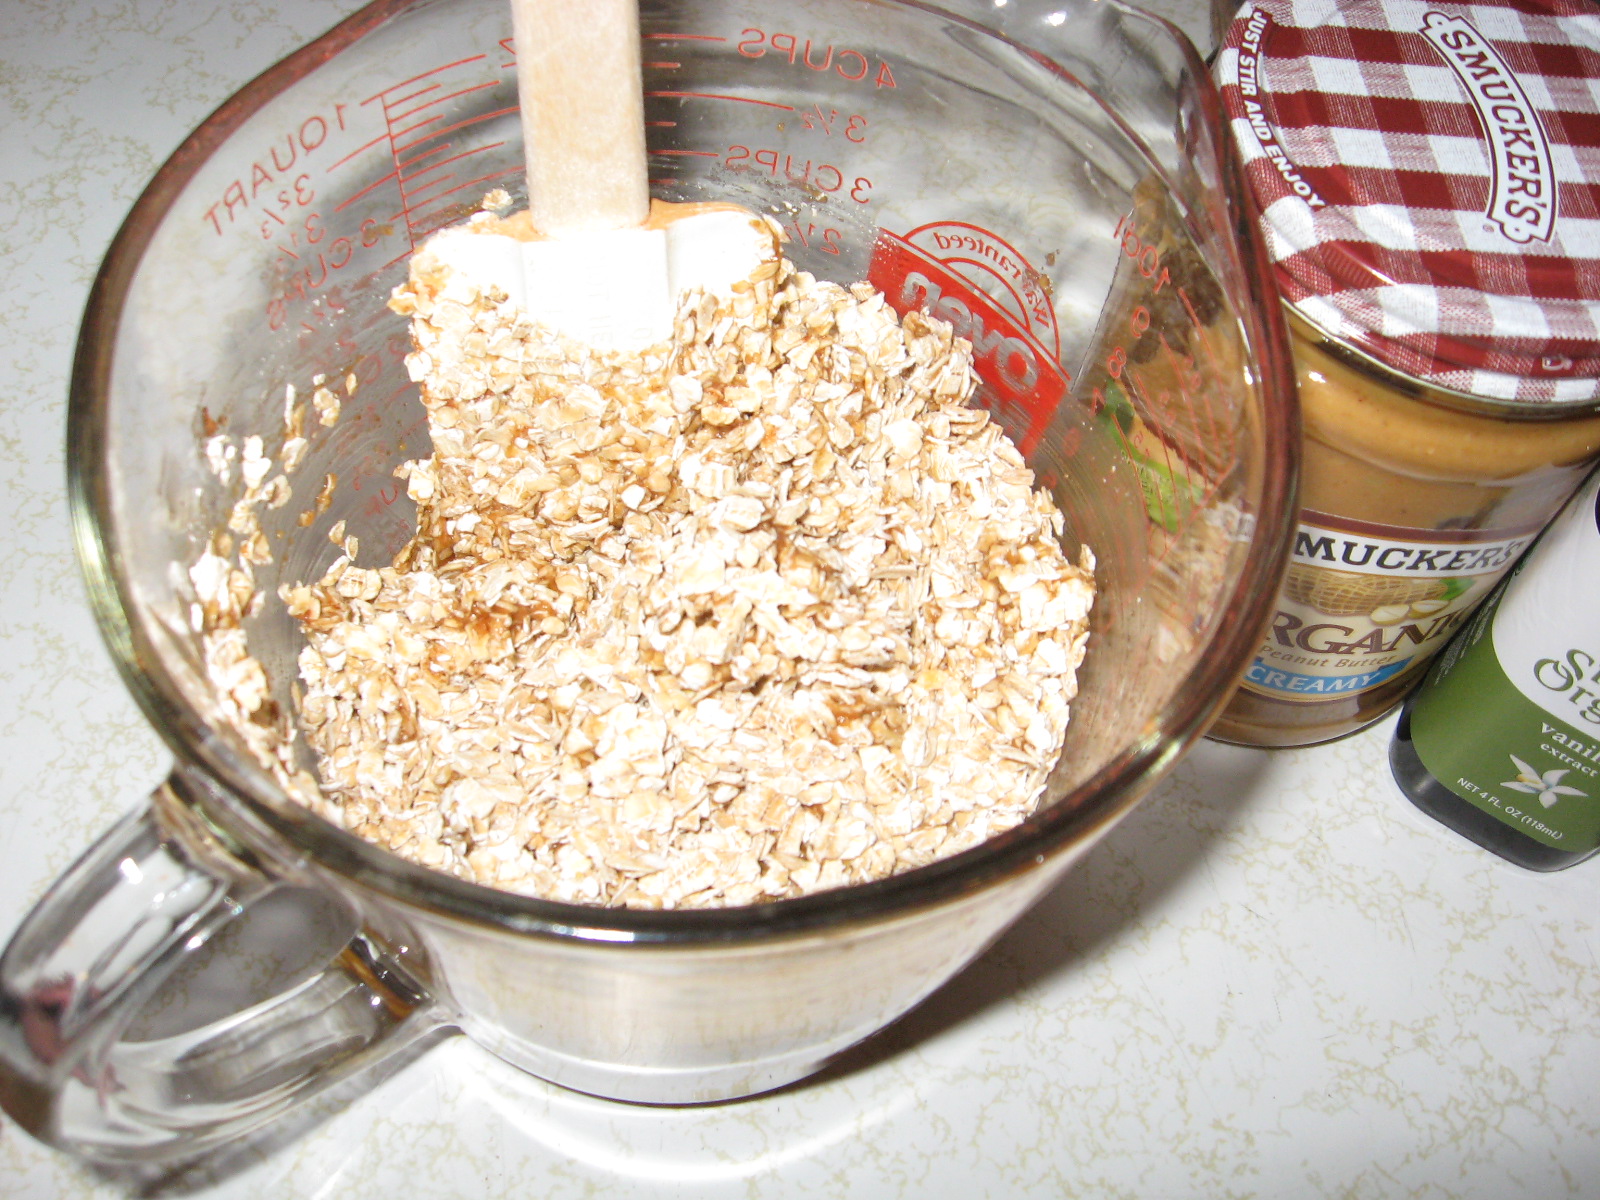
Dehydrator Oatmeal Cookies
4 T. Almond butter (I would think natural peanut butter or sun butter would work and taste similar)
4 T. Honey
4 T. water
1 tsp vanilla
1 tsp. cinnamon
1 1/2 cup quick oats
1/4 cup raisins
Mix first 3 ingredients, and then remainder. Drop by teaspoonfuls on dehydrator tray at 115 for 1 hour. (I used a cookie scoop to measure and drop them onto the dehydrator tray and then pressed them flat with my hands).
When I make them I use Skippy Organic Creamy peanut butter but may try crunchy next time. I use Really Raw Honey with the top scraped off. I don’t care for all of the wax it has in it so I scoop off the top and throw it away.
You could alter this recipe by adding flax seed or changing the raisins to cherries. The next time I make them I’m going to try cherries and see how they turn out.
We don’t drink a lot of pop in our household. On occasion, I will buy bottled vitamin water, or BOT water (for my son), to take with us when we go places. For the most part, we drink water, and take it with us wherever we go.
We have several stainless steel water bottles we fill with water from our Reverse Osmosis unit and place in the refrigerator to chill. Many times we don’t even bother to chill it. We have become accustomed to drinking it out of the faucet. The holding tank is underneath our kitchen sink so in the winter the water is colder than it is during the summer.
The reusable water bottles help save on our trash and recycling. We can wash them out and reuse them over and over. Some of them I place in the dishwasher for easier cleaning.
Sometimes, to break the monotony of drinking water all the time, we will add a slice of lemon to the water to give it a little flavor. My son likes the lemonade you get at the State Fair. When he was little we started recreating it at home for him. It’s much cheaper and tastes the same!
You can make lemonade by the individual glass or pitcher. If you are making it by the glass you only need a small slice of lemon, ice cubes, water and sugar to taste. Place a small section of lemon, or rather squeeze it into your glass, add about a tablespoon of sugar (this will vary according to your taste) and fill the glass ¾ full with water and add ice to fill it. Find a larger glass to place on top of the glass to make a “shaker” and shake to mix until the sugar has dissolved. Remove the top glass and enjoy!
To make it in a pitcher, which is how I typically make it, I start with one to two lemons per quart of water. I cut the lemon into approximately ½ inch sections.
Cut the lemon sections in half. This makes it easier to squeeze some of the juice into the pitcher. I squeeze the lemons to release the juice as I place them in the pitcher. I remove any seeds that are in the lemons and dispose of them.
Add water and the desired amount of sugar to sweeten. I use organic can sugar. Depending on the lemons, I use approximately ½ a cup of sugar- give or take.
Next, I use a potato masher to stir and mash more of the juice out of the lemons. I taste it to see if it needs more sugar or water, if it is too sweet. Once I think its sweet enough, I put it in the refrigerator to chill.
It’s really easy to make your own “Homemade Lemonade”. If you can find organic lemons it will be even better for you. There are no artificial ingredients, coloring, or corn syrup involved in making your own. You know that you will be giving your children a more natural alternative to the prepackaged juice and pop most people consume.
On Tuesday I was stirring the worm farm to aerate and mix up the bedding. I do this about once a week to make sure it isn’t too moist and allow oxygen into the soil. When doing this, I noticed we had new babies that had hatched! There were just a few, but we were getting close to the two month mark and according to my research they multiply in about two to three months. While doing this I also noticed the soil smelled a little. I found research which indicated to stop feeding until the smell dissipates, or add garden lime to the bedding to neutralize the ph.
While out on errands I thought I would stop at our local Early May Garden Center and see if they carried garden lime to add to the farm. I went in specifically stating I was looking for garden lime to help neutralize the ph in a worm farm. The gal that helped me initially tried to sell me pellets. I indicated again, this was for a worm farm, and did they have anything in powder form? She took me to another part of the store and handed me dehydrated lime. I specifically asked if this would harm my worms. She indicated “no, they would be fine”. We talked more about the worm farm and the reason we started it. I had some more items to get so it was awhile before we were ready to check out.
When checking out, I again asked her if this would kill my worms, because I didn’t want anything happening to them. She laughed, and again said no.
My son and I returned home and I proceeded to sprinkle some of the lime on the top of the bedding. I next mixed it into the soil. The worms started to wiggle around like they had never done before. I wasn’t sure what the problem was until I took a couple out to look at. They were bleeding. I quickly looked at the package and started reading it in depth. It indicated the product may cause burns on skin. I noticed my vinyl gloves were starting to leak as well. If this product could cause burns on skin why would she sell this to me to be placed into a bed with worms? I became upset and wondered what I could do to save them.
After a few hours of trying to salvage the worms by rinsing them and placing them into new bedding, we realized it was all in vain. Our entire worm farm perished. It was awful watching them suffer. My son and I were both sick to our stomachs. Not only did we lose the worms we had purchased, we lost the newly hatched babies and the eggs still to hatch. This didn’t include all of the time and effort we put into the project to this point.
Needles to say, neither of us slept very well that night. The next morning I phoned the manager to see what their liability policy was. He indicated that freeze dried lime would be too harsh and shouldn’t have been used in that type of environment. I am still in the process of trying to recover the expense to replace our farm. I will keep you posted on the status in the future.
When I returned to the store on Wednesday to get a refund on the lime, the manager indicated the employee stated she tried to sell us pellets and that she said she told us to be careful with it. I indicated to him after further research the pellets would have had the same effect. I also indicated she never mentioned to us to be careful with it. If she had, I would have questioned purchasing the product. I also specifically said I wanted to make sure what she was selling me was not going to harm or kill my worms. If I hadn’t asked those questions of her, I would have taken the responsibility for what happened myself.
I could easily have gone to another business to purchase my lawn and garden items, but I chose to support a local business; a reputable business in lawn and garden care. This business should be responsible to give accurate information about the products they carry. They should have knowledge of the products they are selling.
As a cosmetologist, if I have never used a product, or I am unfamiliar with it, I do not try to sell it to a customer unless they specifically ask for it. If I sell something, it’s because I have tried it and have used it. How can you sell a product you are not familiar with and make a claim when you do not actually have experience in the area?
What happened to customer service anyway? When I worked in customer service, the customer was always right. It seemed, at times, that motto was at all costs. Now days, many businesses appear not to care if they get your business or not. I can tell you I have several bags of garden material still unopened. All of which may be making a trip back to the store to be purchased at a lesser price elsewhere if they fail to make this right. Replacement cost for my farm was a mere $25. If they choose to stand behind an employee that isn’t knowledgeable, and is dishonest to say the least, they will be losing more than the $25 when the items are returned.
We are back to day one of our worm farm. We have a new cooler, new bedding, and 130 worms to occupy it. It appears they have all migrated toward the bottom of the cooler and are all alive. Now we sit and wait for them to provide us with fertilizer for the garden and multiply.
Today I mashed a pear for the worms to consume. I started with a pear that was very soft and was past the point of giving to the older chicks. I cut the pear in half and took out the seeds and stem. The seeds and stem were then placed into my container to go to the compost pile. I chose not to throw them in the trash, or put them in the garbage disposal. These still contain nutrients that will be of use in the compost bin. I then proceeded to mash the pear with an old potato masher and add the food to the top of their bed.
This masher has come in handy for many things. And to think I almost took it to goodwill with some other household items my husband had when we got married. I have been able to find many uses for items in the past I would have easily gotten rid of because they were older. Many of these items are no longer available for purchase in stores now.
Mashing the pear.
Pear puree added to the top of the bedding.
I inherited many things from both of my grandmother's kitchens after they passed away. Little gadgets you can't find in a store. If you look, and are into seeking out finds, auctions are a good place to find gadgets at a cheap price without paying the higher price for a new one. In addition, you are recycling an item and giving it a new use. Often times the older the item is, the more likely it was made in the USA too!
Today was a dreary day. I decided to take a few minutes to repair a pair of jeans I had ripped. The material was getting thinner from years of wear. For many years I didn’t wear jeans enough to warrant sewing a small hole. I wore dress clothes to work, jeans on Fridays and special occasions. The styles would either change, or my size would. I didn’t keep a pair long enough to show signs of wear.
With the newer styles, I have found various styles of Levis I really like, and wear them often. Jeans have become my main staple in my clothing wardrobe. As I get older, I tend to choose more comfortable clothing. With wearing them more often, also come the signs of wear.
I started repairing my husband’s jeans about a year and a half ago. Before this time, he would continue to wear them with holes for working on the vehicles or mowing the yard. Once he could no longer wear them, they were thrown in the trash. I decided to start mending the holes when they would initially appear. This increased the amount of time he could wear them. It prolonged the use of a pair by at least six months when being worn steadily. This not only saved us money, we weren’t needlessly throwing away an article of clothing simply because it had a hole in it. I don’t wear my jeans out as fast, or to the extent my husband does, however, I try to mend them as needed.
The same goes for other articles of clothing. If my husband looses a button on his BDU’s he doesn’t wait for me to replace or repair it, he does it himself. I was required in junior high to take sewing. I think my husband indicated he also took home economics in school. He doesn’t hesitate to replace a button or make repairs on his BDU’s; however, normal clothing is another area. He tends to leave that up to me. With a busy schedule, I tend to let sewing repairs sit around until I acquire more than I like to take care of. These become a good project for a yucky day. Normally I take them with me in the camper to work on if it rains. Today was one of those days, only I am not in the camper this time. Unfortunately one project was all I accomplished.
Keeping with the recycle and reuse motto, there are many repairs we could make instead of simply disposing of items. If a sheet gets a small tear, simply sew it and continue to use it on your bed. If the sheet is getting older, make the repair and save it as a drop cloth for painting. I have several old sheets I have saved over the years to use as covers for plants when there is a chance of frost. I also use them to cover items to keep dust off of a piece of furniture we are not using at the time, or a piece of exercise equipment. I know exercise equipment should not be allowed to get dusty. Well, some of us can’t always find the time to use them as often as we would like. ҉
Old sheets can have many new uses around the house. Here is a web site that lists may uses for your old bedding. Uses for Old Bedding Before you throw away, get creative and find a new use for the item. Maybe the use is simply giving it to the Salvation Army or local Goodwill store. The less we put into the landfill and can reuse in some way, the better our children’s lives will be.
Worm farm, sounds yucky doesn’t it? That was my initial thought when I first read about worm farms. And the reaction I get from some of my friends. It’s not as bad as you may think.
Our worm farm adventure actually started a couple years ago. I was starting my square foot gardening and worm farm information kept popping up everywhere I looked. After learning worms were great for fertilizing your garden, I decided I wanted to start a worm farm myself.
I purchased a Styrofoam cooler, worm bedding, and food. All I needed to start the project was the worms. We initially thought we could gather our own worms from the yard to get started. The problem was, our worms only came out late at night, and we weren’t about to go outside in the dark to try to catch the amount we would need to start.
After spending the time getting my square food gardening started, I didn’t have time to take on a worm project, so it got pushed aside. The cooler, along with the bedding and food, slowly migrated to the back of my basement. This is where they sat until recently.
Once we decided we were going to be purchasing chickens, I again started thinking about worms. Initially I thought I could feed some worms to the chickens for protein. I did further research to see how difficult of a task this was really going to be to get started. I had no idea they would take awhile to multiply. I found many helpful sites such as:
I was starting to read how others kept their worms in simple plastic totes and was almost ready to go buy a Rubbermaid tote. Then I remembered the Styrofoam container I had purchased a couple years ago. I figured my husband had disposed of it, or placed it where I would never find it. To my surprise it was still there, buried in the back of our basement with the bedding and food next to it. I didn’t read the bedding directions before I left for the store on my search for worms. If I had, I would have noticed the bedding needed to be mixed with water and set for awhile before adding the worms. I stuck the worms I purchased in the refrigerator and proceeded to prepare the bedding. The next day I placed the worms into their new home.
I ended up purchasing night crawlers. I only bought one package because I wasn’t sure how well they would do. I have read night crawlers are not the best choice since they don’t “eat through” the compost material as quickly as red worms. Unfortunately, the only worms available to purchase at that time were night crawlers. You can purchase red worms online, but by the time you pay for shipping they can become rather expensive.
After a few weeks I realized the worms were doing well and thought we should get more to expand the farm. This time when I went to get more the store had Canadian trout worms. They looked small and red, but I wasn’t sure if these were the “red worms” I was looking for without researching. Until I could research them, I decided just get two packages of the red ones and another night crawler. I now have almost 100 worms in the cooler.
Just before adding the new worms, I harvested some of the dirt and replaced it with new bedding. I added more bedding this time since there was going to be more worms living in the container. The pre-packaged bedding mixes contained food already added and you can purchase granules to feed to them as well. These things are found in the hunting and fishing departments of most stores.
I actually liked the first brand of bedding I purchased. It was called Magic Worm Bedding (http://www.magicproducts.com/bedding.htm) When compared to the second package, which was Brown Bear, it was much better. The package of Brown Bear seemed to be ground up newspapers with a lot of dust. The Magic Worm Bedding looked like actual dirt when it was all mixed. The Magic Worm contained less dust, which is nice when you are mixing it in the container. I felt I should have been wearing a face mask when mixing the Brown Bear mixture. I might the next time.
In the meantime, I will be on the lookout for the Magic Worm Bedding and stock up on when I find it. Many sites will tell you to simply add newspapers, topsoil, straw, or manure to your worm farm to start it. I didn’t have access to all of the materials and let’s face it, I live in town, and I wanted something simple and easy to use. Thus the reason I chose the boxed bedding.
The worms have been eating through left over lettuce rather well. Lettuce seems to disappear faster than anything else. I also give them scraps of fruit such as pears, apples, and bananas. The bananas I mashed almost into a liquid. The other fruits I cut them up as small as I could and actually tried to mash them a little as well. I was reading they have very small mouths and have a hard time eating large pieces of food. Some sites recommend actually putting the food into the blender.
Now that the chickens are eating scraps, I have a dilemma. Do I give scraps to the chickens, worms, or add to the compost pile? Most of the time, the chickens win; unless it’s something they don’t particularly care for, or it has gone past the edible stage.
You can buy a fancy home for your worms if you desire. Most average around $100. I found many people using Rubbermaid totes or simply a trash can dug into the ground and buried. I prefer not to have to go to all of that trouble and expense. I keep mine in my basement where it’s cool in the summer, but not too cold in the winter.
I am hoping they will start to multiply soon. I have noticed the bedding is starting to look darker and resemble dirt more than it originally did. This means they are eating through the bedding and consuming the food we are adding to the bed. Many sites discuss worm tea; however, with the cooler I am not set up to drain liquid from the farm. I will have to be happy with harvesting part of the bedding every five weeks or so for my garden.
I hope you all had a great mother’s day and were able to enjoy the day with your families. I spent my day as any normal day. With my husband currently deployed, we do not get to enjoy the holidays, anniversaries, and birthdays as we would like to. My day was spent tending to the chickens, laundry, and baking things we were out of. My husband was able to call later in the day and wish me a Happy Mother’s day as my own mother did earlier in the day.
Thanks to my son, the laundry pile in my living room is no longer there. He was a big help in taking care of the folding for me. He spent most of his day catching up on sleep from his time away at his fathers. He was glad to get home, but I think he was more glad to go back to sleep this morning than anything.
The chickens, after being “cooped” up for two days, were more than anxious to escape the confinement once let into the run. The weather has been colder than the normal temperatures we experience. The chickens came running outside when normally it takes them a little while to mosey down the ramp. Today they didn’t even use the ramp. They started flying from the top step.
Because of the colder weather the past two nights, I had had to cover some of my plants to make sure they didn’t get hit by frost. Frost warnings in May are not normal. I wanted to cover some of the things my son had been working on during the week for me.
My son worked on his mother’s day present for me earlier this week. We looked at purchasing nice, new, stackable blocks to make a flower bed, but once we figured the amount we needed, and the expense, we decided against it. My son’s mind went to work. Trying to reuse instead of purchasing new, he found some red bricks we had laying around and decided to make a flower bed around our pine tree.
It seemed the only thing that would ever grow under the tree was weeds. For the past two years I have planted marigolds around the tree to keep the weeds at bay. I had saved the seeds from plants that were growing in front of my house and used them to propagate the bedding around the tree. The second year they came back on their own, and I was able to add more of the saved seeds to fill in areas that were sparse. This year I had planned to do the same, until he had a better idea.
Since the coop is now next to the tree, my son thought it would be nice to dress it up. We remolded the area by adding the same mix I am using in my square foot garden beds. We planted three hostas and added some decor. The bird bath and chicken my son picked out at our local Hy-Vee garden center. We grabbed a couple rocks he had laying around that he had found while vacationing in Wyoming and added them with some stepping stones we had in storage. He said he was going for a red theme. He was so excited to get started on it, and the results are great. I’m really pleased with our new “garden”. And we were able to reuse items we already had!
Yes, that is right. We have chickens in our house. We now have six new additions which are around two weeks old. These little chicks are more skittish than our first ones. The first ones were ordered from Hoover's Hatchery and are doing great. (http://www.hoovershatchery.com/)
Before we decided to get chickens my son and I researched the various breeds. He decided he wanted to get Silver Laced Wyandotte chicks. These would not only make good pets, they were also a pretty bird. Luckily this was a breed the hatchery carried. Both of us have allergies to cats and dogs so we felt chickens would be a great alternative for a pet. Not only will they make great pets, we will have some fresh eggs sometime this fall.
They newest chicks are a different breed, and are talking a little longer to warm up to us. We purchased them at our local TSC on April 28th. They indicated to us they received them at the store on Monday. These appear to be a few days older than they anticipated. Their wings seemed more developed at an earlier age so we are guessing they were closer to a week old when we purchased them. They did indicate their hatchery was out of state, and since the birds arrived on Monday, the difference in shipping time would account for the variance between those we ordered locally.
None the less, all of them appear to be doing fine. They are starting to warm up to us slowly. Just yesterday they started eating out of our hands. They are already perching on a wooden towel bar we put inside their box, and scratching bedding into their water and food every time we turn around.
Originally were only going to raise the six chickens we initially purchased; however, my son decided he wanted to get two more. He wanted some more babies of a different breed. The second batch of babies is amber and black sex links. They are suppose to be a good breed for pets and will lay brown eggs just like the Wyandotte chicks.
After some begging and pleading, since TSC would only allow us to purchase six, we came home with six more to start the baby process all over again. To be honest, we had just graduated the others to their new home and I was happy to have them outside. What can I say, I love my son and he knows how to get to me.
These newest editions will be grown and outside with the others in no time at all. I’m amazed at how fast they grow. It seems like they are growing right before our eyes. Just like our own children who grow up too fast. Before we know it, they will be out on their own leaving us to wonder where the time went.